

G Suite is a web-based set of productivity applications from Google. It is a brand of cloud computing, collaboration tools, software and products developed by Google. To know about more features of it, you can visit here.
Here, in this blog, we will see how to migrate the emails from one G Suite account to another. The detailed documentation is available on their site but it creates confusion and quite difficult to understand it because all steps don’t have described on the same page. So, instead of switching pages, what if all the pieces are on the same page? It would be very easy to understand and implement it. Right?
Let’s start then!!!
Note: Before start the migrations, make sure you are logged in with new G Suite Admin Credentials.
Step – 1: Setup the Data Migration Service
- In your Google Admin console
- Go to Data migration app.
- Select the Email option and click Continue.
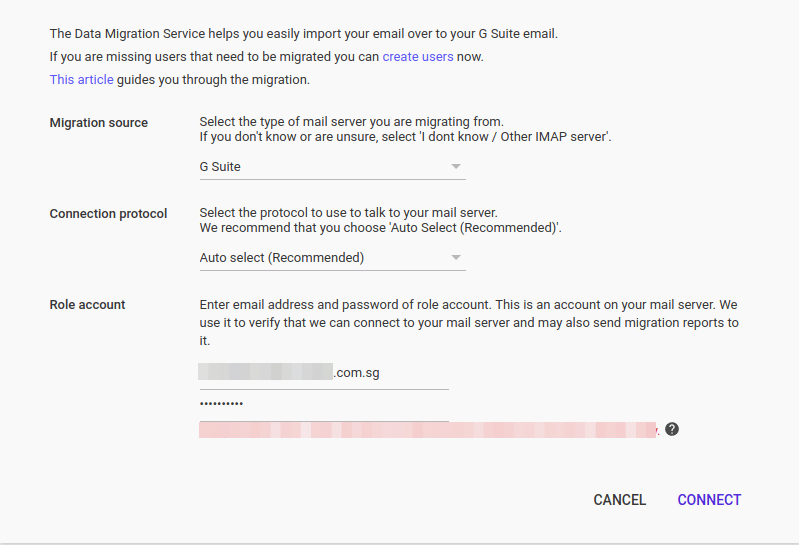
- On the Email Migration screen:
- From the Migration source list, select G Suite.
- From the Connection protocol list, select Auto select.
- Enter the role account information for your old administrator’s G Suite email address and password.
- Click Connect to start the migrations. It will detect your old G Suite account.

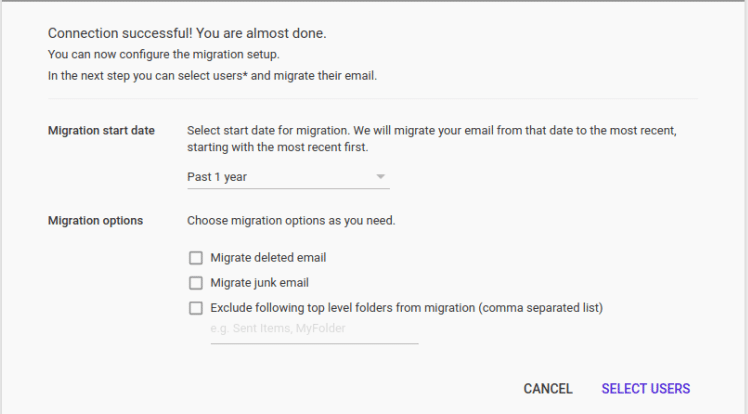
Step – 2: Configure the Migration Setup
- In the next screen, we can select the Migration start date and options based on requirement. I have select Past 1 year. So, the email will migrate of last one year to till date.
- There is one option to select our custom date as well. So, we can migrate between those date ranges.

Step-3: Select User(s)
We can migrate one or more than one user accounts at a time. To do this we would need to follow the below steps.
- Complete the above steps to set up the data migration service.
- Click on “+” icon and select multiple users.
- Click Attach file to upload a CSV file containing the legacy email addresses and the new G Suite email addresses and passwords. Click Upload and start the migration.
- We can see the status on migrations Dashboard.


That’s it!!
Read Also: How to Send Automated Email in Ruby on Rails with Mailgun
Bug & Solution:
Now, what would you do if you would get an error in Step-1 like “Authentication error? The username or password you entered is incorrect. Please verify” and your credentials are correct?

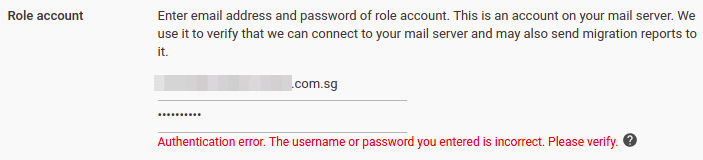
Here is the solution:
Enable the “Less secure apps” for your account.
- Go to Admin Console.
- Click Security > Basic settings.
- Under Less secure apps, select less secure apps.
- In the subwindow, select the Allow users to manage their access to a less secure apps radio button.

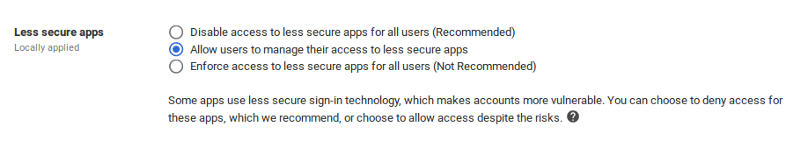
- Now make sure logged in with your account and go here and check that the toggle button is enabled. If not then enable it and reconnect.

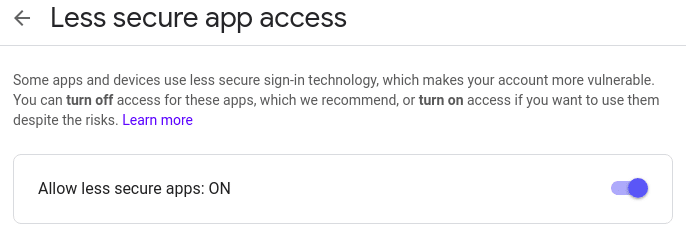
- Don’t forget to turn it to “OFF” after finish the migrations.
Click here for more details…
At BoTree Technologies, we build enterprise applications with our DevOps team of 30+ engineers.
We also specialize in RPA, AI, Python, Django, JavaScript and ReactJS.