
React with Redux – Step by Step with Tasky App!
When I first started learning Redux with React, I wish I could find the simplest tutorial ever with full functional Example ??….. Don’t be fooled by all the fancy talk about reducers, store, actions? – Redux is incredibly simple.
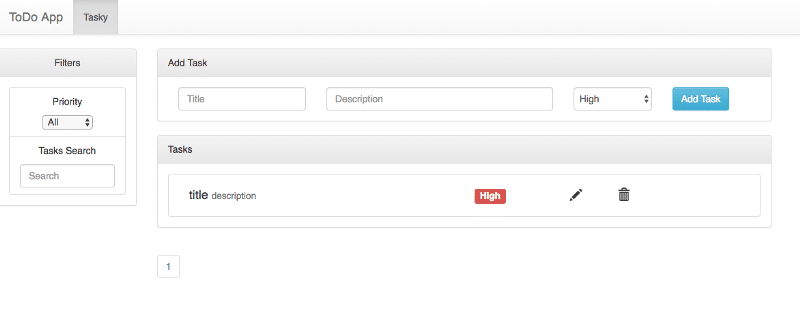
By the end of this blog You will get one Tasky application like,
Why I need redux in My React Application?
You can manage your whole application with states and props but managing this ever-changing state is hard.
If a model can update another model, then a view can update a model, which updates another model, and this, in turn, might cause another view to update.
At some point, you will no longer understand what happens in your app as you have lost control over the when, why, and how of its state.
This is the main motivation to learn redux in React Application.
Let’s first discuss some core concept of Redux, Then we will quick start to make Tasky App.
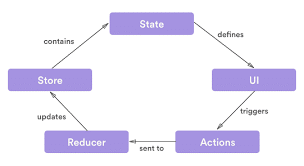
Store: One big object contain all application States.
Actions: User will perform action like calling webservice, press button or refresh the list.
Reducers: All action will call related reducers and Reducer will update the store.
UI: when we connect our UI components to store it will reflect the changes as reducer update store data.
How to create React native app with Redux from scratch?
Now coming to our Tasky App!
Create React app
If you already setup the react-cli then open terminal and run
create-react-app taskyapp

cd taskyapp

npm start
If you have not setup the react then follow instruction on Setup ReactJS.
Install and configure Redux
Redux is simple library and we need to use it with react, We will use package called react-redux
Install related node packages by npm or yarn.
npm install - save redux react-redux react-router-dom redux-thunk redux-persist redux-logger lodash react-bootstrap
Packages info
- redux: library for implementation of redux
- react-redux: combine redux with react
- react-router-dom: used for navigation in react application
- redux-thunk: redux directly do not support asynchronous coding, So we need to use this. We can also use redux-saga instead of it.
- redux-persist: It will make our store object persistent.
- redux-logger: it will create console log for every action user dispatch.
- lodash: javascript library for manipulating array.
- React-bootstrap: using bootstrap classes in React application.
Add bootstrap linking in public/index.html by adding following code.
public/index.html
And for other linking method go to React-bootstrap.
Make src/actions, src/reducers, src/screens, src/component, src/store folders.
mkdir actions reducers store containers components

touch actions/index.js store/store.js reducers/index.js containers/main.js containers/tasky.js
Wire your redux – store, action, containers and reducers
Make store/store.js file.and add the following code.
store.js
- First we import combineReducer from reducer index which we are going to write later in this blog.
- In persistConfig, we are using local storage to save our store data So, Store data will not initialize every time.
- Then we will make array of middleware and adding react-logger middleware only in development purpose for generate logs of all actions trigger by user.
- Then createStore with persistent combine reducer and middleware and export it.
Make reducer/index.js file.and add the following code:
reducer/index.js
- Import combineReducers and export it,We will edit this file later.
Now it’s time to make one simple component to wrap with redux provider.
So lets edit file containers/Tasky.js with below code:
Now edit main.js with below code.
- In the above code we are defining routes for all application with
react-router-dom. - In
<Router>tag we are defining<Switch>.<Switch>is using to navigate only one route from the list. When we click on<Link>tag, it’s To parameter will decide which route to navigate.
Now, we are going to bind our redux store with the root component of the application. Edit app.js with the following code.
app.js
If everything is working well you will get the following output.
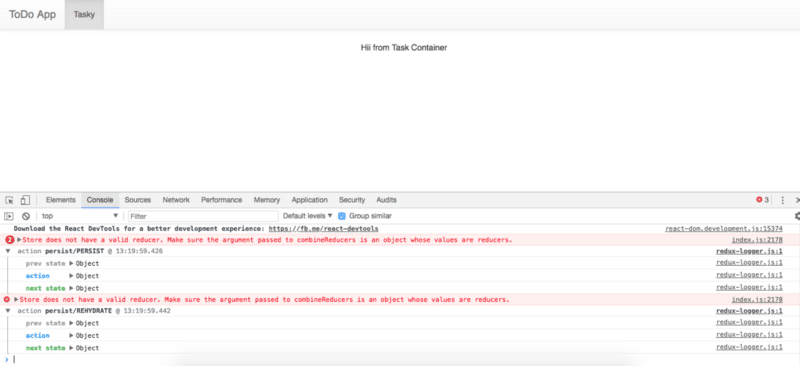
You will find some logs in console screens.
As we have initialize redux-logger package with our store middle-ware, It is showing logs for all actions which is dispatch. one error is showing because we have not initialize any reducer yet.
Now, we are going to make some basic UI (some pure react components) as our main focus in a tutorial is redux don’t bother about components and UI design.
cd src/components
touch addTask.js filterTask.js listTask.js listComponent.js
Above command will create related files and edit this files with below code.
First we change the add task code. Edit addTask.js
Edit listTask.js
Edit listComponent.js
Edit filterTask.js
Now, all we need is to call all component in our tasky component.
Edit tasky.js with the following code:
After replacing all the code when you run the application again you will get the following output.
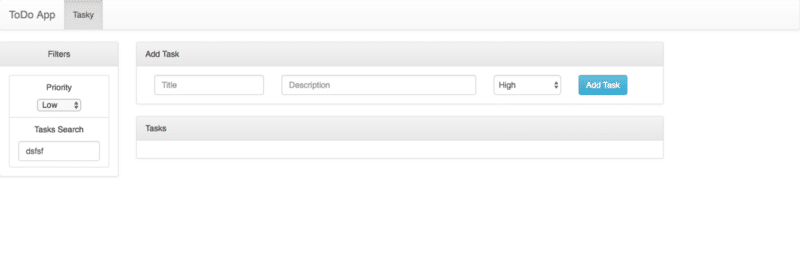
Up to this, it is a simple react application. Now we will store our task list in redux store object and add edit filter and delete our task with redux actions.
First we will make one reducer of a task. For that, we need to navigate to reducer directory and make file taskReducer.js and add the following code.
This is the basic code that every reducer contain. We can define our initial state of store object in reducer.
Now we need to add this taskreducer to combineReducer and use that in store. To implement this we will edit reducer/index.js file with the following lines:
Now, we will connect tasky.js file to store.
For this connect function is used it is from react-redux package. It has two parameters
- mapStateToProps: In this we get store object value in our component
- mapActionToProps: In this all actions can be registered to edit store. All actions are defined in actions files.
Now, edit tasky.js with following lines:
After connecting you will get output like this.
Now work on add Task functionality.
For this, first, we need to add constants of action in the index file and make one taskAction.js file in the same folder.
Edit actions/index.js
export const CREATE_TASK = "CREATE_TASK";
Edit action/taskAction.js
In taskAction, we have created one function called createTask in that we are returning one object having type and payload.
So now in reducer, we need to define this type to modify the store.
Now, we need to add one case for createTask in taskReducer.js file.
Now need to call that action when Add task button is clicked, So edit Tasky.js with the following code.
In this way you can make actions for edit, delete and filter task
You can find a working demo with all functionality on this link.


