
How to Integrate PayUMoney in your Spree Commerce Store with Ruby on Rails?
What is a Payment Gateway?
A payment gateway is a merchant service provided by an eCommerce application service provider to authenticate and process payments via various payment modes.
It plays the role of the third party that securely transfers money from your bank account via any payment mode to the merchant’s payment portal. An eCommerce web development company can assist you in integrating a payment gateway with your online store.
Various examples of payment gateways: PayUMoney, Stripe, PayPal, etc.
Why PayUMoney?
PayUMoney international payment gateway is India’s leading payment gateway with 4,50,000+ merchants in India with over 100+ payment methods. It allows payment with just a single tap. It is a trusted, instant, and most secure payment gateway.
It also provides features like Auto OTP reader, saved cards and transaction management on the merchant’s dashboard. It also allows paying via credit cards, debit cards, UPI, net banking, wallets, etc.
It supports international payments with multi-currency support including Indian currency too.
Isn’t it amazing, right!!
You can also refer to the Developer Guide here.
Now, let’s see how we can integrate PayuMoney with Spree Commerce development.
Read more: Integrate Stripe Payment Gateway in Spree Commerce
How to Integrate it into the Spree store?
PayU provides 2 ways to integrate web checkouts with an eCommerce store.
- Redirect Checkout
- BOLT Checkout
ReDirect Checkout:
It is a quick and easy way to integrate payment checkout. It also allows us to accept payments via credit/debit cards, net-banking, UPI, wallets.
Why ReDirect checkout?
- Requires a few lines of code
- No PCI-DSS Compliance Required
- Mobile-Friendly checkouts
Pre-requisites:
- Sign up to Payu
- The merchant and salt keys are available on the merchant’s dashboard.
Configurations to Spree Store:
- Adding payment gateway to spree store
- Add your payment gateway to the app/models/spree/gateway as payu_in_gateway.rb .
- Configure the gateway to the spree store in spree.rb.
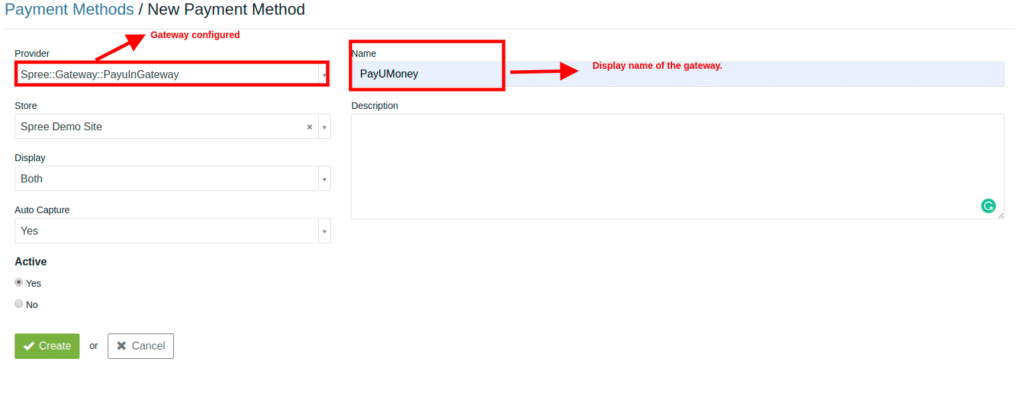
- Create a payment method for the gateway configured.
- Login as admin.
- Go to Configurations > Payment Methods and visit New Payment Method.
- Add the payment method as shown in the below screenshot:
3. Add a blank partial for the PayU payment method in the path app/views/spree/checkout/payment/_payu_in.html.erb
4. You can now see your payment method on the frontend in the standard checkout process as shown below:
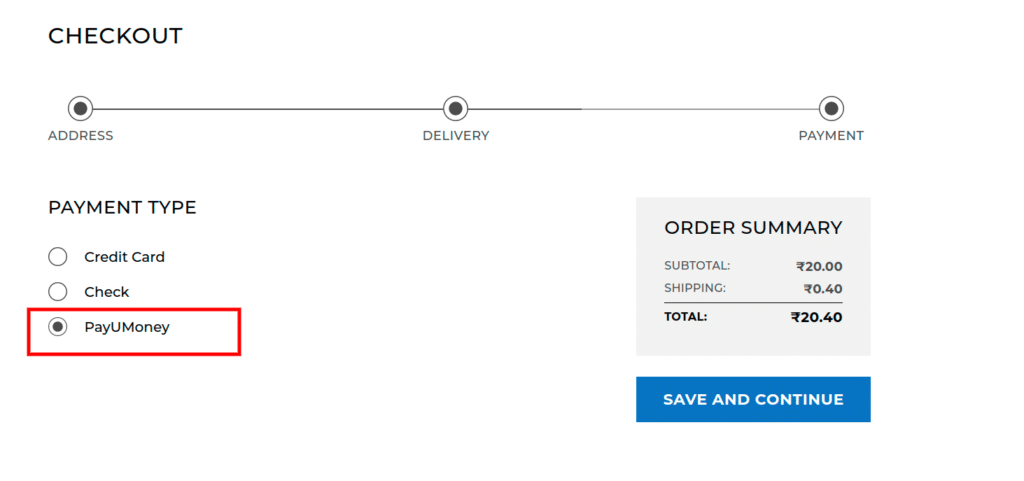
Note: Don’t forget to add the keys i.e. merchant key and salt key available on the merchant’s dashboard in the payment method we created above.
Now, if we click on the Save And Continue button it should pay with PayU, Right?
To send the payment request to PayUMoney ensure that you have valid credentials i.e. valid merchant key and salt that are available on the merchant’s dashboard, set the request parameters as it requires and handle the response as per the requirement.
What Customizations need to be done at our end/Code level changes?
To pay with PayUMoney international payment gateway, you need to override the checkout_controller, handle the payment processing and store the response in a table, received after the success/failure payment transaction if required.
Overriding the checkout controller:
Call a before_action filter to pay with PayUMoney for the payment state and the PayUMoney Gateway.
before_action :pay_with_payu, only: :update, if: :payment_with_payu?
In the pay_with_payu, you need to add this code for the POST request to the PayUMoney.
Request handling with PayUMoney:
- Set the request parameters.
The required request parameters are:
- key – Available on merchant dashboard.
- txnid – An Unique alphanumeric Transaction ID generated by you to uniquely identify the transaction. Its limit is 30 characters.
- amount – Transaction/Order amount to be paid (Typecast it to float).
- productinfo – Product description.
- firstname – Firstname of the order placer.
- email – email of the order placer.
- phone – phone/mobile number of the order placer.
- surl – Success URL for handling response at the client-side.
- furl – Failure URL for handling response at the client-side.
- hash – Encrypted value generated with the help of some mandatory parameters to protect against men in the middle attack.
- service_provider – ‘payu_paisa’
Note: You can also add other parameters to the request such as an address, city, state, country, zip code, etc. These are optional parameters for a PayUMoney payment request.
- Generate a request hash ( Before transaction ).
Generate a SHA512 hash with the mentioned mandatory parameters with the following order and pattern:
key|txnid|amount|productinfo|firstname|email|udf1|udf2|udf3|udf4|udf5||||||salt
Where, udf1, udf2, ..udf5 are user-defined fields that are not required to be the required parameter of request but required to generate the SHA512 hash – encrypted value.
Salt – available on the merchant’s dashboard.
For a detailed reference, you can visit here for request hash generation.
- Redirect to the Payu payment page.
After generating the hash, POST the required parameters to TEST_URL ( https://test.payu.in/_payment ) in test mode or LIVE_URL ( https://secure.payu.in/_payment ) in production mode.
Response Handling with PayUMoney:
After Posting the required parameters, you would have either state of the transaction i.e. success or failure.
So accordingly, you will get the response to surl/to furl mentioned in the request.
You will get all the parameters in the response you posted while payment requests.
Only, the hash in the response hash is modified as it is generated by the merchant.
Verify the authenticity of the response hash to avoid any cyber attacks.
Generate a response hash ( After transaction ).
Response hash – encrypted SHA512 hash generated with the parameters returned in the response with the following order, pattern and “|” as a separator:
salt|status||||||udf5|udf4|udf3|udf2|udf1|email|firstname|productinfo|amount|txnid|key
It is just the reverse order of the request hash string with the status variable between salt and udf1.
For a detailed reference, you can visit here for response hash generation.
Note: Don’t forget to verify the authenticity of the transaction via a hash verification, ie: The hash generated by you should match the one sent by PayUmoney in response.
2. Payment processing:
After the payment gets completed in the checkout state, the payment records associated with that current order don’t change the payment state to complete.
Hence, to transit the payments state from checkout → complete, we have to override payment/processing.rb for spree store.
It has a process! and cancel methods overridden for PayUMoney.
Also Read: How to add Product Reviews Feature to Spree Commerce
Note: If you want the response to be stored in the database you can store it in a table as per your requirement for the application. If you want to handle the refunds/reimbursements, cancellation of order on the PayUMoney end these functionalities can be even handled with the help of ActiveMerchant and for a detailed reference, you can have a look here.
You can also continue reading for the Bolt checkout flow for PayuMoney with Spree integration here.
You can find the whole source code for PayUMoney Integration with the Spree store here.
You can hire an expert ruby on rails development company for complete spree commerce store development with PayUMoney integration.

