
Integrate Stripe Payment Gateway in Spree Commerce
Spree provides handy extensions to integrate various types of payment methods, including both online and offline options. To configure one of the supported payment gateways, you must first install the Spree_Gateway extension on your store.
This guide describes how to add Stripe payment gateway to your Spree store.
Providers
Once the extension has been installed, you can configure Stripe payment gateway in the Admin Interface by clicking the “Configuration > Payment Methods” tab and then clicking the “New Payment Method” button.
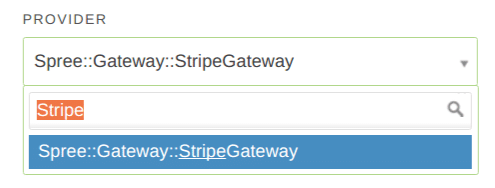
Search ‘Stripe’ in Providers drop down and you can see Spree :: :: Gateway StripeGateway and select.
Payment Method Name
Give the payment method a name. The value you enter will appear on the customer-facing area of your store. e.g. Credit Card

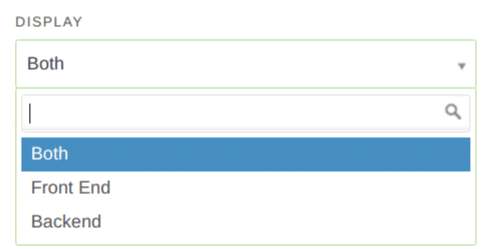
Display Value
Set display value, whether you want the payment method to appear on the Frontend or the Backend of your store, or both.
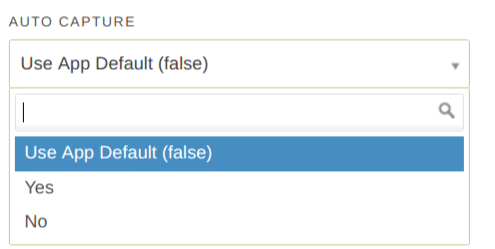
Automatic Recording
If you set it as False then authorization will be done at purchase time but actual charge will be done when the order is marked as shipped. You can capture payment from Orders > edit page. If you set it as true then the payment will be captured automatically.
Active
Select “Yes” if you want the payment method to be active on your store. Select “No” if you want to create the payment method, but not present it on your store.
Once you hit “Create” button after entering the desired settings you will be asked to enter ‘SECRET KEY’ and ‘PUBLISHABLE KEY’ on next page.
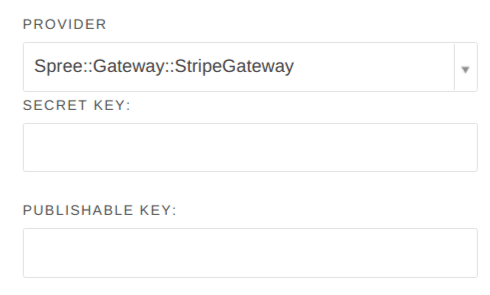
You can get those keys from your Stripe account.
Create Stripe Account
Create new account in Stripe if you don’t have. After log in you can see API tab in sidebar.
By clicking the API tab, you can see ‘API keys’ section and you can find ‘Publishable key’ and ‘Secret key’ key there. These are your testing credentials. You need to ‘Activate your account’ from side bar to get live API keys.

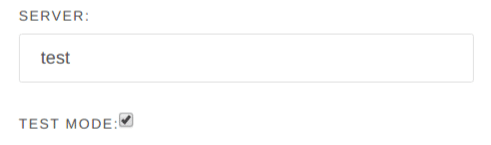
Copy those keys and add them in your stripe payment method form. You can write ‘test’ in server field and can write ‘live’ when you add live keys.
Check the ‘Test Mode’ check box while you are testing the Stripe Payment Gateway and uncheck it when you add live keys and allow user to pay on real time store.
Now, hit the ‘Update’ button to save changes and you are done with Stripe gateway configuration.
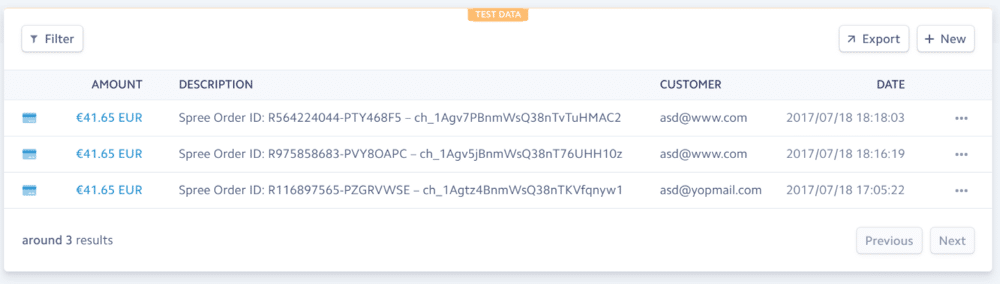
Customers now can make payment using credit cards and you can verify received payments from Payments tab in stripe dashboard.
At BoTree Technologies, we build web and mobile applications to add value to our client’s business. We align ourselves to ensure that our client benefits the most out of our engagement.
Drop us a line to discuss how can we help take your business to the next level.


