jQuery Tag-it -Integration with rails
Sometimes we come across situations where we need to add tags to some items e.g. there is an online shopping website which sells various items such as clothes, electronics, books, mobile accessories etc.
Now if there are items such as earphones, power banks, data cables etc. these all can be commonly tagged as mobile accessories. Tagging makes it easy to group the items and also facilitates searching. So when any user searches for the mobile accessories we can show all the items related to this tag.
jQuery tag-it is an excellent jQuery UI plugin with auto-complete support. Also, it is very easy to integrate with rails app.
Installation
First of all, you will need to download jQuery UI plugin files from here and tag-it plugin files from here.
Then copy jquery-ui.css, jquery-ui.structure.css and jquery-ui.theme.css from the jQuery UI folder and jquery.tagit.css from the Tag it folder to your rails app and require them in you manifest CSS file in the following order.
After that copy all the images stored in the images folder in the jQuery UI folder. Create a directory app/assets/images/images and paste all images files.
If you are working with Rails 4, you need to rename the file from jquery-ui.css to jquery-ui.scss and jquery-ui.theme.css to jquery-ui.theme.scss then change all the image URL path to asset-url in these files as follows
background-image: asset-url("images/ui-icons_444444_256x240.png");
After this, copy jquery-ui.js and tag-it.js and require them in the following order in your manifest js file.
Usage
Now create a view file, add the tags in the ul, give it an id and initialize the tag-it with this specific id only.
That’s it! Isn’t it really simple!
Now all the tags written in the <li></li> tags will come pre-loaded and you can add new tags as you want. Also when you try to add any tag which you have already added it will highlight the tag and now allow to add you second time. This is cool!

You can easily remove the tags by using backspace or by clicking at the cross icon beside the added tags. You can find the working demo of it on this link. Also you can add various themes and do as many customizations as you want.
Various parameters can also be passed during the tag-it initialization. I have found some really interesting ones which I have incorporated into my project.
availableTags(Array)
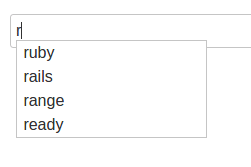
Tags which are added in the array of availableTags will be given as suggestions in auto-complete.

tagLimit (integer)
This will limit the number of tags added by the user.
This doesn’t allow the user to add tags more than the specific limit, but wait it also doesn’t show any appropriate message as well, this is where the callbacks come into the picture.
We can use onTagLimitExceeded callback for this.
Now when you try to add more than specified tags it will show alert messages.

If you want to do something special before/after the tag is added/removed you can easily do it with beforeTagAdded/afterTagAdded and beforeTagRemoved/afterTagRemoved callbacks.
You can find all the options at https://github.com/aehlke/tag-it#options, events at https://github.com/aehlke/tag-it#events and methods at https://github.com/aehlke/tag-it#methods.
This helps us adding the tags in a simple, elegant and efficient way.
You can find the full source code at https://github.com/AnkurVyas-BTC/tag-it-example.
Thanks for reading! Please hit the heart button if you enjoyed reading 🙂
At BoTree Technologies, we build web and mobile applications to add value to our client’s business. We align ourselves to ensure that our client benefits the most out of our engagement.
We work in Ruby on Rails, Python, Java, React, Android, iOS and RPA as well.
Drop us a line to discuss how can we help take your business to the next level.
References:
jQuery Tag-it!
Actual extensible and idiomatic jQuery UI widget.aehlke.github.io


