
Rails 6 jQuery upgrade with webpacker
Adding jQuery to Rails 6 with webpacker will enable you to write ES 6 flavored JavaScrip applications in no time.
An essential thing to note is that Rails 6 comes installed with webpacker by default so you don’t need to install it separately. In this article, I have outlined the process of adding jQuery-Rails with webpacker to your Rails version for building your frontend of the application.
This blog is divided into three sections:
- jQuery in an older version of Rails
- Webpacker Installation
- Add jQuery with webpacker
1. jQuery in an older version of Rails
If you are using an older version on Rails and added jQuery to it. Then the easiest way to add Ruby on Rails jQuery was to use jquery-rails gem.
By doing so the jquery and jquery-ujs files will be added to the asset pipeline and available for you to use. If they’re not already in app/assets/javascripts/application.js by default, add these lines to add jquery Ruby on Rails:
//= require jquery//= require jquery_ujs
If you are running Rails 5.1 and up, and if you have included //= require rails-ujs, then jquery_ujs is not needed anymore. You can just add:
//= require jquery
Adding jQuery in this way makes it part of the rails asset pipeline.
Now if you are upgrading your rails version to Rails 6 and use it with webpacker then you need to remove jquery-rails from Gemfile.
Remove below from application.js
//= require jquery//= require jquery_ujs
2. Webpacker Installation
Webpacker gem uses Webpack to manage app-like JavaScript modules in Rails jquery install and configuration.
Webpacker makes it easy to use the JavaScript pre-processor and bundler webpack 4.x.x+ to manage application-like JavaScript in Rails 6 jquery. It coexists with the asset pipeline, as the primary purpose for webpack is app-like JavaScript, not images, CSS, or even JavaScript Sprinkles (that all continue to live in app/assets).
Rails 6 comes with webpacker by default so you don’t need to do anything for it! When you create a brand new jquery Rails 6 app it will add webpacker and will do the configurations for you. Rails webpack doesn’t have difficult configurations during installation.
If you are upgrading rails app from an older version then you need to add below line manually in your Gemfile
gem 'webpacker', '~> 4.x'
Once you have added it then you need to run the following command to install Webpacker:
$ bundle exec rails webpacker:install
Optional: To fix “unmet peer dependency” warnings,
$ yarn upgrade
Once installed, you can start writing modern ES6-flavored JavaScript apps right away:
Rails will provide you with the basic directory structure as follows
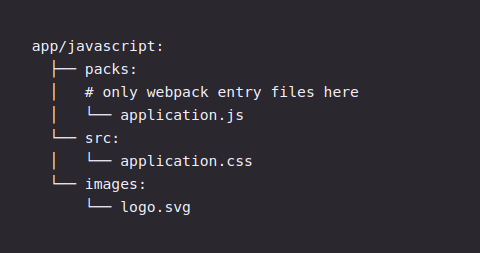
In /packs/application.js, include this at the top of the file:
import 'core-js/stable'import 'regenerator-runtime/runtime'
You can then link the JavaScript pack in Rails views using the javascript_pack_tag helper.
<%= javascript_pack_tag 'application' %>
So by doing this, your Rails webpacker jquery installation will get completed. No need to do the above steps if you already are using Rails 6.
3. Add jQuery with webpacker
In our Rails application run below command to add jQuery.
$ yarn add jquery
This will add jquery to Rails 6 to your application frontend. This is similar to being a jquery webpacker plugin. So we can access it in the webpacker. Just add following at config/webpack/environment.js
module.exports = environment
Add require<code(“jquery”) to your <codeapp/javascript/packs/application.js
Now you will be able to add JQuery in Rails 6 application!
Consulting is free – let us help you grow!


