
DJango Websocket with SocketIO
Websockets have been gaining traction as React and other front-end technologies, and are becoming increasingly popular.
What are Websockets?
WebSocket is a computer communications protocol, providing full-duplex communication channels over a single TCP connection. It is not part of your normal Http protocol.
Websockets are generally required when we want frontend to be notified once there is some change in the backend. Like, in a gaming application, if multiple users are watching a scoreboard and we want to notify each of the connected users whenever there is an update in the score, we can use a websocket.
To handle the above scenario there are 2 options. First, we develop some kind of polling mechanism on the frontend which will keep checking for an update on the server. This is a very resource-consuming and inefficient approach. Imagine hundreds of client requesting a server for some information every few seconds.
Websocket comes as a solution where server pings the registered client whenever there is change, and this is not based on HTTP protocol so there is no load on the server application. Client and server establish a dedicated channel over which messages are exchanged from both the ends. Each client has its own socket with the client.
Let’s look at some code. We had used SocketIO on frontend, so we had to use the same on the DJango backend. We found that Django Channels was not easily compatible with React-based socketIO. Thankfully, SocketIO provides a library for WSGI based applications.
Read More: Django with ReactJS
How to Integrate SocketIO with Django Application?
Create a normal Django project.Add following in the txt and install all the dependencies
enum-compat==0.0.2
eventlet==0.21.0
python-engineio
python-socketio
pytz==2018.7
six==1.10.0
Add socket app in your settings.py installed apps
INSTALLED_APPS = [
‘socketio_app’,
…
]
In the view.py you need to add following lines
Note that socketio runs in async mode i.e. it will not be part of the request response process. Hence, we have mentioned async_mode='eventlet'. Eventlet is the module which will spawn a new thread for each connection. We will talk more about it in the deployment section.
Apart from this, we need to override callback methods if we want to do something when connection is established or disconnected.
Add following code in wsgi file for connecting to the client
For emitting the messages from server to client, you need to put this line wherever you want we generally put it in signals.py
sio.emit('my event', {'data': 'foobar'}, room=user_sid)
Deployment Strategy
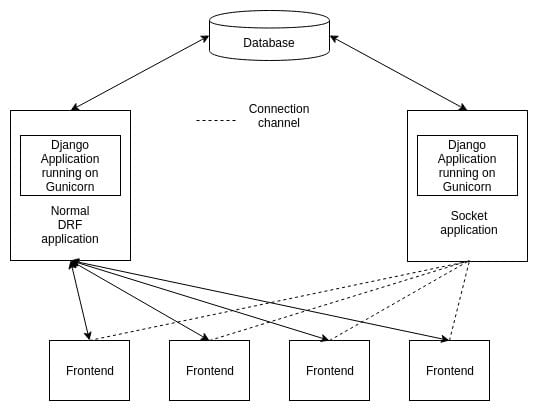
- Deployment is tricky, as sockets are not based on HTTP protocol. The application server generally allocates a separate process or thread for each request. Hence, we need to use Gevent, which act as an event loop and whenever there is a request for connection it spawns a new thread and assigns the connection to this thread.
- We decided to keep the socket application separate from normal application as accommodating both the normal Django function and socket application in a single Django application made the request response handling sluggish.
- Moving socketio code to another application also helped maintaining the code easier.
- Integrating eventlet requires to change the gunicorn bash file as follows
Click here for more details…
At BoTree Technologies, we build enterprise applications with our Django team of 20+ engineers.
We also specialize in RPA, AI, Python, Ruby on Rails, JavaScript and ReactJS.
Consulting is free – let us help you grow!

